Showing posts with label chocolate. Show all posts

Friday, April 15, 2011

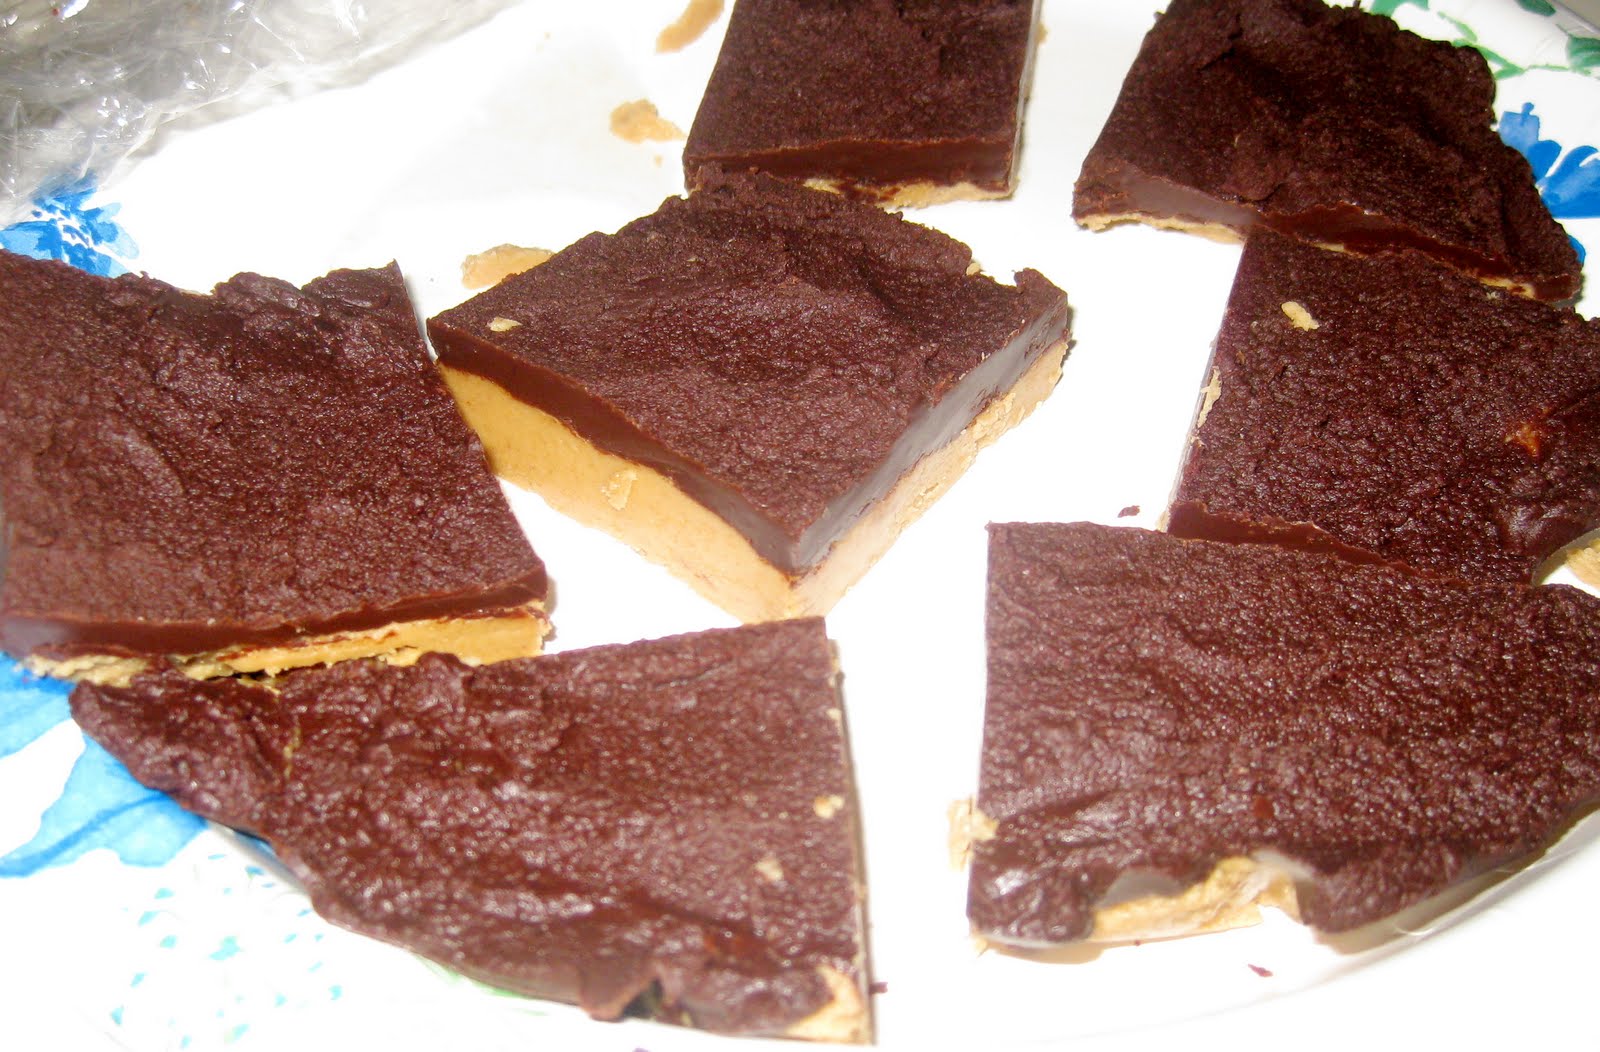
Chocolate Peanut Butter Bars


This recipe has become one of my favorite go to recipes for that sinful dessert. Ridiculously easy, this recipe is rich and delicious with chocolate and peanut butter running throughout. Best of all, no oven is needed, so your kitchen can stay cool and so can you, especially with temperatures on the rise. This is the perfect dessert to make for a potluck or a party. Everyone will be asking for more!

Chocolate Peanut Butter Bars Nigella Lawson

1/2 cup dark brown sugar {packed}
2 2/3 cups confectioners' sugar
1/2 cup + 2 tablespoons softened unsalted butter {divided}
1 3/4 cups creamy peanut butter
10 ounces milk chocolate chips
8 ounces bittersweet chocolate {chopped}

Cut a piece of parchment paper big enough to line a standard sized brownie pan, with a bit of overhang. Grease the brownie pan & lay in the parchment paper.
Combine the brown sugar, confectioners' sugar, 1/2 cup butter & peanut butter in the bowl of an electric mixer fitted with a paddle attachment. Blend until smooth. Dump the mixture out into the pan & press it down, making it an even as possible.
Melt the chocolates & 2 tablespoons of butter in a double boiler, or in a heat-proof bowl set over simmering water. Stir occasionally to combine. Spread the melted chocolate over the peanut butter base & smooth out the surface.
Put the pan in the refrigerator, until the chocolate is set. Remove the bars from the pan by lifting on the overhang of parchment paper & slice into squares using a sharp knife. It may help to warm the knife under hot water to get through the hard chocolate layer more easily. The bars are very rich, so 1" squares would be a good size.

Suggestion: Try using different flavors of peanut butter to mix it up! There are so many different kinds out there, from white chocolate to cinnamon raisin, to more!

Wednesday, January 26, 2011

Ooey Gooey Molten Chocolate Cake


Wow, it's been over a month since my last post! I guess I've been busy traveling across the globe, getting over being sick, and tying up some loose ends in my life, but now I'm back and have so much more time in my life to cook and bake and bake bake bake! Soooo looking forward to trying so many different creations.

I decided that my first post back would have to be pretty special and indeed it is! This recipe is my new obsession and I seriously can't find anything wrong with it. Make this ooey gooey molten chocolate cake if you want to impress someone. They'll never know that it's super easy and takes hardly no time at all. This rich, decadent, amazing chocolate cake is for sure a crowd pleaser and a recipe you'll keep coming back to!

Ooey gooey molten chocolate cake by Gordon Ramsey from My Sweet Life

Serves 4

  • 8 tablespoons unsalted butter, plus extra to grease
  • 4 teaspoons unsweetened cocoa, to dust
  • 4 ounces good-quality bittersweet chocolate (minimum 70% cocoa solids), in pieces
  • 2 large eggs
  • 2 large egg yolks
  • 2/3 cup superfine granulated sugar
  • 2/3 cup all-purpose flour
  1. Heat oven to 325° F. Grease 4 large ramekins with butter, about 3 inches (7.5 cm) in diameter. Cut a small, square piece of parchment and place in the bottom of the ramekin and grease with butter, then dust liberally with cocoa.
  2. In a small bowl set over a saucepan of hot water, slowly melt the chocolate and butter. Remove bowl from heat and stir until smooth. Let cool for 10 minutes.
  3. Using an electric whisk, whisk the whole eggs, egg yolks, and sugar together until pale and thick. Add the cooled chocolate mixture and whisk just to combine.
  4. Sift the flour over the mixture and using a large metal spoon gently fold in.
  5. Divide the batter between the ramekins and bake for 12 minutes.
  6. Turn the chocolate cakes out onto warmed plates and serve immediately.
Suggestion: You can totally use a cupcake pan for this if you don't have ramekins, just beware that the centers will be extremely gooey, but who ever said that was a bad thing??? :)

Sunday, November 14, 2010

Oreo Cookies


Okay, confession time. I don't like Oreo cookies. Yes, you read that right. I'm just not such a fan. There are so many other things I would rather eat. I know many people out there (those die hard Oreo fans) reading this probably want to kill me for saying that, but read further, and I promise you will be happy that you did. I was baking for a bake sale, and thought that I would take the opportunity to try something different. And you know what, it was sooo worth it. These cookies are soo good!! A typical cookie batter with loads of chocolate chips and crushed pieces of Oreo cookies running throughout each delectable bite, these cookies are so fun, and the Oreo cream really makes them stand out. Make these for your next party, or anytime you need some fun in your life! So maybe I don't hate Oreo's as much as I thought.....

Oreo Cookies from Lovin' in the Oven

  • 1 stick softened butter
  • 6 Tablespoons sugar
  • 6 Tablespoons brown sugar
  • 1 egg
  • 1 teaspoon vanilla
  • 1 ¼ cup flour
  • ½ teaspoon baking soda
  • ½ teaspoon salt
  • 11 broken pieces Oreo Cookies
  • 1 cup chocolate chips

1. Preheat oven to 350 degrees F. Cream butter, and sugars until well combined. Add egg and vanilla until mixed well.

2. Place flour, baking soda and salt into a large bowl, stir to combine. Slowly add dry ingredients to wet ingredients then stir in oreos and chocolate chips until just combined.

3. With a medium cookie scoop, scoop onto baking sheet. Bake for 10 minutes or until cooked, but still soft.Let cool on baking sheet for 3 minutes before transferring to cooling rack.


Suggestion: It would be so fun to try adding different flavored Oreo cookies into this resipe. Mint, strawberry milkshake, anything you like! Try it. :)

Nutella Cookies


Nutella. You know, that delicious European hazelnut and chocolate spread? Yeah, I am pretty much in love with it. Eaten off of a spoon, on whole-wheat bread, or get this, in a COOKIE, nutella just continues to blow my mind! I came across this cookie recipe on stumbleupon.com (my favorite website) and I knew that I had to give it a try. From the beautiful caramel like color of the cookies, to the delicious nutella and chocolate flavors running throughout each bite, this cookie is a must try. A little different than the typical chocolate chip or oatmeal cookie, this is a great recipe if you want to mix it up a little bit. Trust me, you won't be disappointed!

Nutella Cookies from Sugar and Spice

Ingredients: 2 cups all-purpose flour 1 teaspoon baking soda 1/2 teaspoon salt 1/2 cup butter (1 stick) 1 cup sugar 1/2 cup brown sugar 2 eggs 1-1/2 teaspoon vanilla 1/4 cup Nutella (I like adding an extra 1/4 cup for a little more Nutella flavor) 1-1/2 cups chocolate chips Directions: 1. Preheat the oven to 375 degrees and prep baking sheets with silpats or parchment paper. 2. In a large bowl whisk together the flour, baking soda and salt. 3. In the bowl of an electric mixer, cream the butter, the sugar and the brown sugar. Add the eggs and the vanilla until combined. 4. Gradually add the flour until the mixture is combined. 5. Then mix Nutella. Finally add in the chocolate chips. 6. Use ice cream scoop and drop on baking sheets and bake for 9-11 minutes.

Suggestion: Mix it up and have some fun! Add different flavors of chocolate chips, or throw in some nuts to take it up a notch. Might I suggest adding hazelnuts to pick up that Nutella flavor!

Classic Chocolate Chip Cookies

I'm all about mixing it up in the kitchen, putting a twist on a recipe, but sometimes great is great, so why mess with that?! Nestle Tollhouse Chocolate Chip Cookie recipe is like that for me. Growing up, I would come home from school to warm gooey chocolate chip cookies pulled from the oven as a special treat. This recipe is always perfect and reminds me of home. Fool proof, these chocolate chip cookies are simply perfection. Buttery, chocolatey, gooey, and chewy, these cookies are where it's at!

Nestle Tollhouse Chocolate Chip Cookies

Ingredients

  • 2 1/4 cups all-purpose flour
  • 1 teaspoon baking soda
  • 1 teaspoon salt
  • 1 cup (2 sticks) butter, softened
  • 3/4 cup granulated sugar
  • 3/4 cup packed brown sugar
  • 1 teaspoon vanilla extract
  • 2 large eggs
  • 2 cups (12-oz. pkg.) NESTLÉ® TOLL HOUSE® Semi-Sweet Chocolate Morsels
  • 1 cup chopped nuts (I never add the nuts, as it is a smoother cookie without the nuts)

Directions

PREHEAT oven to 375° F.

COMBINE flour, baking soda and salt in small bowl. Beat butter, granulated sugar, brown sugar and vanilla extract in large mixer bowl until creamy. Add eggs, one at a time, beating well after each addition. Gradually beat in flour mixture. Stir in morsels and nuts. Drop by rounded tablespoon onto ungreased baking sheets.

BAKE for 9 to 11 minutes or until golden brown. Cool on baking sheets for 2 minutes; remove to wire racks to cool completely.

Suggestion: Have a little fun. Add some different kinds of chocolate chips. They now come in the most innovative flavors, like peanut butter and even cinnamon! Or, try some nuts, like pecans, walnuts, whatever you like!

Sunday, October 17, 2010

Hot Chocolate Marshmallow Cupcakes


Heaven. Pure bliss. Pretty much enough said.

These cupcakes, texturally a cross between a brownie and cake are incredible. Moist, chocolaty, and rich from the delicious dark chocolate, paired with the broiled marshmallow on top, these cupcakes are a hit. This is the perfect bite of indulgence to welcome in fall. Who needs a cup of hot chocolate when you can have one of these little delights? Seriously, these are so worth trying tonight.

Hot Chocolate Marshmallow Cupcakes from Cupcakes Galore by Gail Wagman

Makes 12 cupcakes

8 ounces dark chocolate
1 cup (2 sticks) unsalted butter, room temperature
4 eggs
1 cup sugar
3/4 cup all-purpose flour
1 teaspoon salt
1/2 cup mini-chocolate chips or grated chocolate
Marshmallows for decoration

Preheat oven to 350 degrees F. Melt chocolate and butter in a double boiler or microwave until JUST melted. Set aside until just warm.

Cream the eggs and sugar together until light and foamy. Add flour and salt and mix. Pour in the chocolate mixture and beat until batter is smooth.

Spoon batter into 12 cupcake papers. Sprinkle a scant teaspoon of mini-chocolate chips or grated chocolate over each cupcake and bake for 15 minutes. Remove cupcakes from oven. They will be very moist inside.

Place a marshmallow or several mini-marshmallows on each cupcake. Put cupcakes under broiler for a few seconds until marshmallows start to brown. This will take only a second so be very careful. Remove form oven and wait for about 5 minutes before eating since marshmallows will be very hot. These cupcakes are best eaten still warm.

Suggestion: I've made these cupcakes with no butter and with only 1 stick of butter (instead of the 2 sticks the recipe calls for). They are delicious either way, so feel free to use whatever amount of butter you're comfortable with.

Sunday, October 3, 2010

Puppy Chow/Muddy Buddies aka Heavennnn


This is one snack with many names. Some may argue about what it's truly called, but one thing everyone can agree on is that it is deliciously sinful. Simple, inexpensive, and decadent, this one is a hit. Just a warning, do be careful when you make this: it is addicting. My roommate begged me to take it out of the house for a week before I finally gave in. Regardless, this recipe is not only tasty, but fun to make too. A great project for kids and adults alike, get in the kitchen and give this one a try. I promise you won't be disappointed, maybe just a little bit too indulged. But then again, to each his own. :)

Puppy Chow/Muddy Buddies by Alice on Savory Sweet Life

Ingredients:
9 cups Chex cereal ( whatever you prefer)
1 cup chocolate chips
1/2 cup creamy peanut butter
1/4 cup butter
2 teaspoon vanilla
1 1/2 cups powdered sugar
2 1-gallon ziplock bags

Directions:
Place cereal in a large bowl and set aside. In a medium microwavable bowl, add chocolate chips, peanut butter and butter. Microwave on High for 1 minute and stir. Microwave 30 seconds longer and stir mixture until smooth. Stir in vanilla. Pour sauce over cereal and stir until evenly coated. Spoon half of the mixture in each 1-gallon resealable ziplock bag. Add 3/4 cup powdered sugar to each bag, and seal. Shake the bag until everything is coated. Spread on waxed/parchment paper to cool. Store in airtight container in refrigerator.

Suggestion: Make this dish user friendly. Are you a fan of crunchy peanut butter? Add that instead of creamy. Try dark chocolate or white chocolate for a twist too. Have fun. Regardless, it'll definitely be tasty.

Saturday, June 19, 2010

This is no Reese's!

It's summer and it's hot! Every time I step in the kitchen I secretly dread turning on that oven. But as usual, I was craving something sweet, so I thought, why not use the freezer? Yep, it is possible to create a decadent, sinful, delicious dessert with the help of just your freezer. How do dark chocolate (full of antioxidants and can lower blood pressure) peanut butter cups sound? Delicious, right!? These have you leaving the kitchen cool as can be and asking the question, "What's a Reese's?".

Dark Chocolate Peanut Butter Cups
Makes 12-15 mini peanut butter cups

12 oz. any kind of chocolate you like (I prefer dark chocolate)
1/3 cup of creamy peanut butter (try crunchy for a twist)
1/4 cup crushed graham crackers
1/4 cup confectioners' sugar

Melt the chocolate in a pan over low heat being sure to continuously stir until all of the chocolate is melted. Place mini cupcake liners in a mini muffin pan. Using a pastry brush, brush the melted chocolate on the bottom and sides of the mini cupcake liners. Be sure that there is a good coating, as this will be the base of the candy. Place the muffin pan in the freezer for 5-10 minutes until the chocolate sets.

While the chocolate is setting, mix the peanut butter, confectioners' sugar, and crushed (very fine) graham crackers in a bowl.

Remove the muffin pan from the freezer and place about a teaspoonful of the peanut butter mix into each cup. Press down on the peanut butter mix, so that it spreads a bit. With a spoon, pour more melted chocolate on the top of each cup, so that you can no longer see the peanut butter mixture.

Place back into the freezer for 20 minutes to set, and then remove to enjoy some decadence in a tiny little package!

Suggestion: This is no Reese's! Be creative and try different combinations of ingredients. White chocolate with a raspberry peanut butter filling, dark chocolate pecan, or whatever you seem to be craving. Have fun with it!